This article is Part 3 of the Microsoft Access tutorial.
Here’s what’s included in this article:
- Create a query (so you can “search the database”).
- Create a form for data entry.
- Create a macro (so that a multi-step task can be done automatically – at the click of a button).
About Queries
Queries allow you to “search the database”. But it’s not just any old search.
A query allows you to specify exactly which fields you want returned, and from which tables.
A query also lets you add criteria for filtering the data. So for example, you could specify that you only want to see orders worth more than $100, or only products of a particular brand, or only customers who have only ever purchased one item, etc.
Queries can also be saved to the database. So no need to rebuild the same queries over and over again. Simply open it from the database and it’s ready to go.
Sample Data
You’ll need to have some data in your tables before you create a query.
Here are the three tables that we created earlier in the tutorial, but this time they contain data.
(If you already have data in your tables, skip this step).
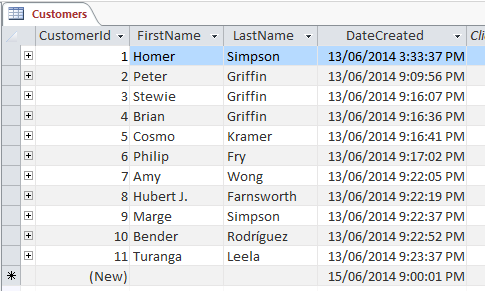
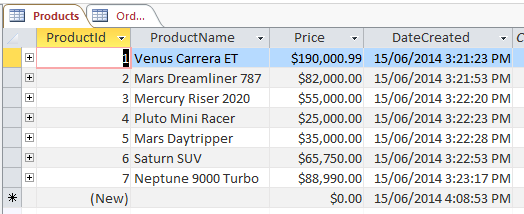
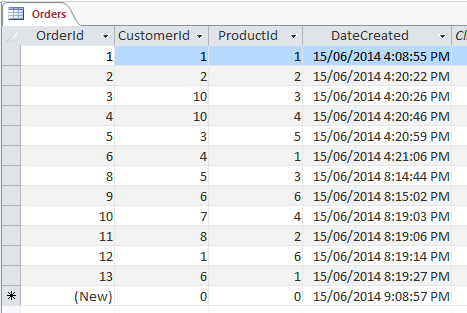
You can copy the data from these tables or you can add your own.
Three things to remember:
- The ID fields and DateCreated fields will be populated automatically. No need to enter data into those fields (remember, one’s an AutoNumber and the other has a Default Value set). Only enter data into the two middle fields of each table.
- Do the Orders table last. Enter data into the Customers table and the Products table first. Then once all the primary keys are populated, you can enter data into the Orders table. You need to do this because we set up the database to enforce referential integrity. This means you won’t be able to enter a value into a foreign key field that doesn’t correspond to a value in the primary key field.
- On the Orders table, make sure the values of the CustomerId and ProductId fields match those in their respective primary key fields.
Create a Query
OK, so now that we have data, we can create the query.
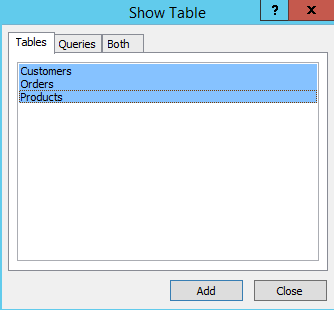
Click the Query Design button from the Ribbon.

Access will ask you to select the tables to include in the query. Select all, click Add, then click Close:
Access will display the Query Design View. This allows you to specify the exact criteria you’d like to use in the query.
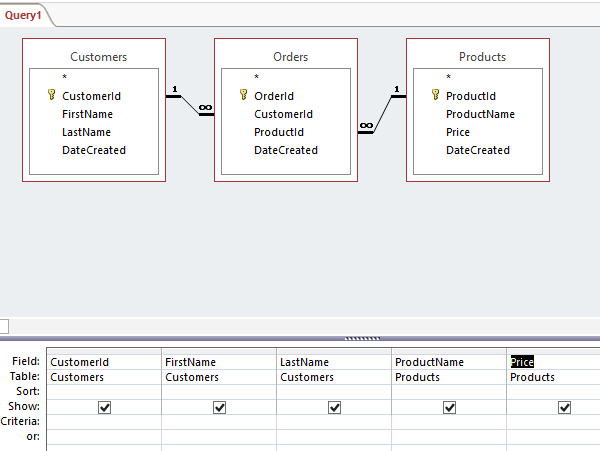
Set it up like the above screenshot then click the Run button in the Ribbon:
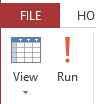
Clicking the Run button will run the query. Clicking the View button next to it will also run the query.
The Results
Access will now display the results of your query:
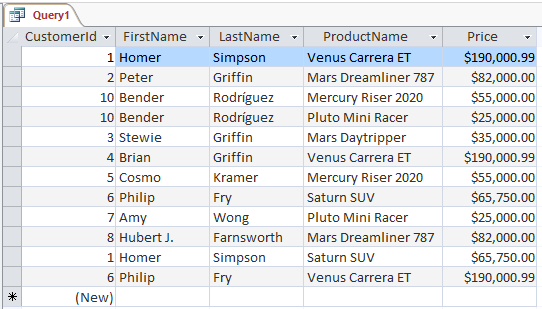
Notice the query is displaying fields from two different tables, but it is presented as though it’s a single table. Also, it is using a third table (Orders) but not displaying any fields from that table.
Of course, this is how we designed the query. We could just as easily have included fields from the Orders table, but we didn’t need them in this case.
So, queries provide a lot of flexibility for retrieving data and displaying it.
When you set up your database correctly (so that it maintains data integrity), you can be confident that your queries will return all applicable results – no more, no fewer.
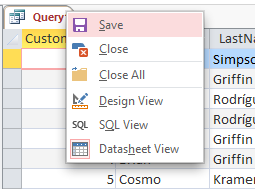
Save the Query
If you think you might need a query again, you can save it. Just right click on the Query tab and click Save. Call it Customer Orders:
Check out How to Create a Query in Access for an example of how to make some minor modifications to the above query (scroll down to Modifying the Query).
Create a Form
Now let’s create a form. We’ll make it a form that enables users to enter new customers. So when a user enters data into the form, that data will be inserted into the Customers table.
Access makes it easy to create forms like this. If you select a table or query, Access will automatically create a form based on the selected object. So to create a form based on the Customers table, all you need to do is select that table before creating the form.
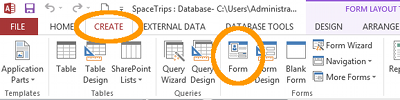
So, ensuring that the Customers table is selected (in the left navigation frame), click the Form button from the CREATE tab on the Ribbon:
This creates a form based on the selected object (in this case, the Customers table).
The Form in Layout View
The form is initially displayed in Layout view. Layout view allows you to set up your form while it is populated with real data. You can even enter data while in this view:
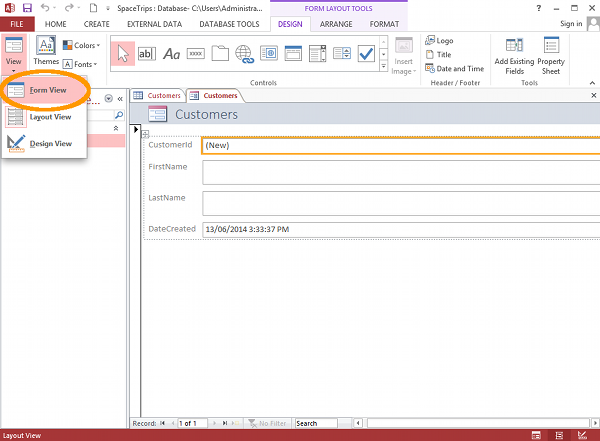
Go ahead and click Form View from the View button/menu. If prompted to save the form, call it Customer Form and click OK.
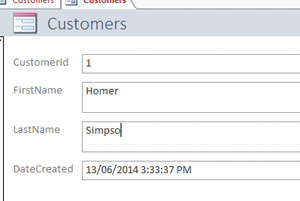
The Form in Form View
This will display the form as the user will see it.
The Form in Design View
Now switch to Design View (using the same View menu as before).
This displays the form in a more design-oriented way. You’ll see a grid across the background, which helps align elements such as labels, and input controls. You will also notice that no data is displayed in the form. This allows you to make changes without data getting in the way.
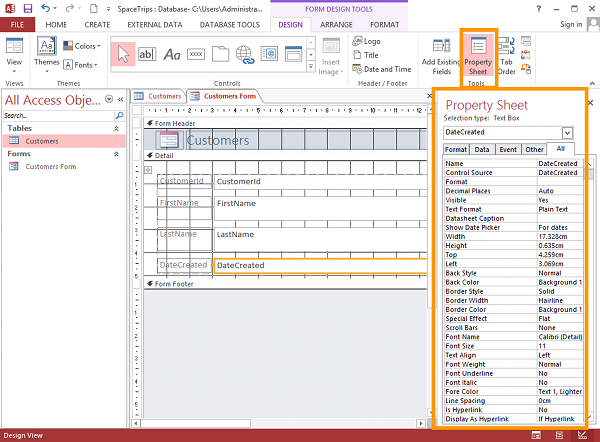
The above screenshot shows Design View with the Property Sheet open and highlighted. You can use this to make specific adjustments to the controls on your form.
For example, you can do things such as:
- Set a field to “locked” so that the user can’t edit, add, or delete the data. Try doing this to the CustomerId and DateCreated fields.
- Apply an input mask, so that users can’t enter data in the wrong format.
- Change colors, such as background color, border color, font color, etc.
- Change fonts and font styles, weights, etc.
- Specify the alignment for the text in the form.
- Set the height and width of the control.
- Show a date picker.
- Much more.
You can also use Design View to click and drag items around, add headers and footers, etc. You can also modify the labels (eg, add a space to FirstName to make it First Name, etc)
Have a play around with the form to see how you can format it. Don’t be afraid to switch between views to see how it looks.
Create a Macro
Now we come to macros. A macro is a set of actions that can be run automatically. For example, can have a macro run whenever the user clicks a button, or you can have it run automatically when they open the database.
Macros are usually created to simplify common, repetitive tasks.
For example, if you find yourself always opening the Customers Form every time you open the database, why not create a macro that opens it automatically? That will save you from having to find the form and double click on it every single time you open the database.
So, using that example, let’s go ahead and try it.
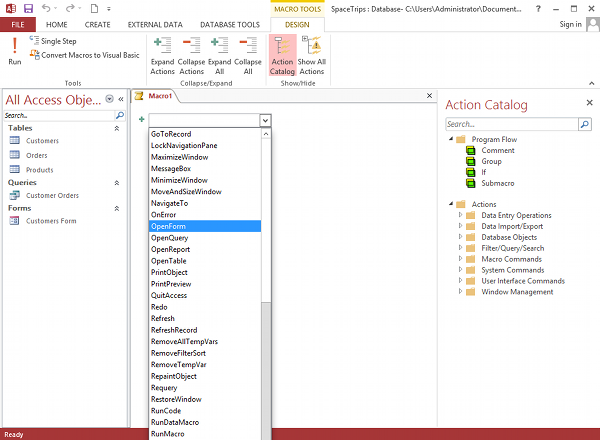
Click Macro from the CREATE tab on the Ribbon.
You will see a combo box. Select OpenForm from the combo box:
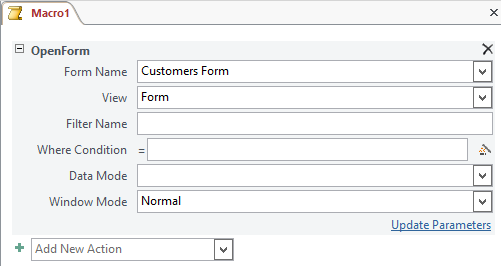
Here, we customise the OpenForm action (such as telling it which form to open, which view to open it in, etc). Use these settings:
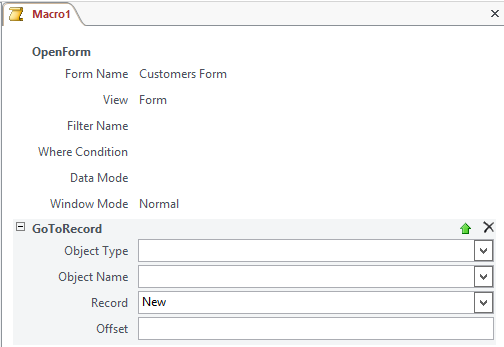
Now select another action from the combo box. This time select GoToRecord. This will make the form open a new record every time the macro runs.
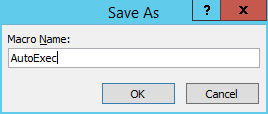
Now save the macro by clicking the Save icon. Be sure to name it AutoExec. This is a special name that causes the macro to run every time the database is opened.
This macro should now run every time the database is opened. Test it out. Close the database, then open it again. You should see the Customers Form open at a new record, ready for a new customer to be entered.
Clicking a Button to Run a Macro
You probably won’t want all your macros running every time the database opens. You might not want any running every time the database opens.
One option is to create a button for the macro. So, the macro won’t run until the user clicks the button.
Here’s how to add a macro button to a form so that the macro only runs when the button is clicked.
Previously
Return to Part 2: Design View, Field Properties, & Relationships.
Return to Part 1: Databases, Tables, & Fields.