This article is Part 1 of the Microsoft Access tutorial.
Here’s what’s included in this article:
- Create a database.
- Add a table to the database.
- Add four fields to the table, name/rename them, and set up their data type.
Create a Database
Let’s start by creating a blank database.
When you first open Access, a welcome screen is displayed. You can create your first database straight from there.
- Click Blank desktop database
- Name the database at the prompt and click Create
That’s all there is to it! You will now be proud owner of a blank database. And it will look something like this:

But you need not go to the welcome screen every time you want to create a database. You can also do it from the File menu (from the top menu).

For more screenshots and detail, see How to Create a Database in Access.
Create a Table
Your new database will already have one table called Table1. Access creates this automatically when you create a new database.
Let’s create another one:
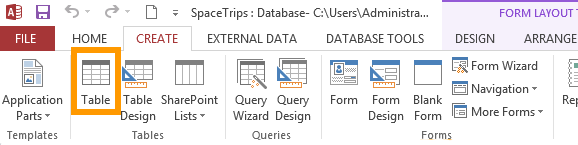
- Click CREATE from the Ribbon
- Click Table
Here’s what that button looks like on the Ribbon:
You’ll now have another blank table in your database. So you can click that button any time you need to create a new table.
Most Access databases have lots of tables. Each table stores a different set of data. For example, you could have a “Customers” table that stores customer info, a “Products” table that stores info on products that you sell, and an “Orders” table that stores info on which customers ordered which products.
Now, if this was an Excel spreadsheet, you might start adding data right about now.
But this is Access.
One of the differences between Access and Excel, is that the tables in Access require some extra setting up before you start adding lots of data.
The first thing you need to do is add fields and name them.
Add Fields to the Table
Fields are basically another name for column. Fields will store the data. You give each field its own name (eg, “CustomerId”, “FirstName”, “LastName” etc).
Now the thing is, when you add a field, you must select a data type for the field. This data type tells Access the type of data that will be stored in that field. By assigning a data type, Access can make sure that nobody enters the wrong type of data into that field. For example, no one will be able to enter a phone number into the “FirstName” field.
Normally, when you create a table, Access creates the first field called ID with a data type of AutoNumber. It assigns this field as the primary key for that table. More about primary keys later. For now, let’s create three more fields.
To add each field, click on the Click to Add header and select the data type (see below for the data types to use).
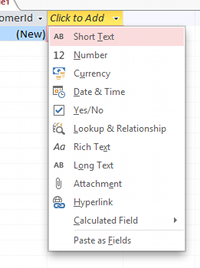
Once you select a data type, Access will highlight the field header with Field1. You can type over the top of this to change the field name to something more meaningful.
Once you’ve added three more fields, you will have four fields. Rename the ID field to CustomerId (see below for how to rename fields).
Use the following names and data types:
| Field Name | Data Type |
|---|---|
| CustomerId | AutoNumber |
| FirstName | Short Text |
| LastName | Short Text |
| DateCreated | Date & Time |
Quick Tip: You can also add new fields by adding data directly into the cell underneath the Click to Add text. Access will assign a data type to the field based on what you enter. So if you enter say, “Bob”, Access will probably make it a Short Text field.
If you use this method, be sure to check the data type. Access can only guess, based on what you entered now. It doesn’t know what data will need to be entered in the future.
Also, when you create fields in this manner, Access will name each field Field1, Field2, etc. You can (and probably should) rename these to something more meaningful.
Renaming Fields
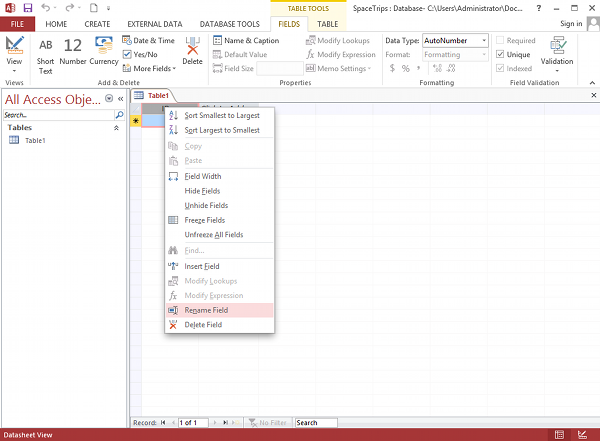
You can rename fields by right clicking on the field header and selecting Rename Field.
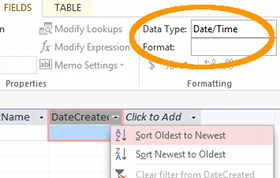
Changing Data Type
You can change the data type from the FIELDS tab in the Ribbon:
Next Up
Next, for part 2 of this Access tutorial, we’ll look at Design View, Field Properties, & Relationships.