In this SQL tutorial for beginners, you will create your own database, insert data into that database, and then run queries against that database.
This SQL tutorial will get you running SQL queries in no time!
SQL Example
Here’s an example SQL statement:
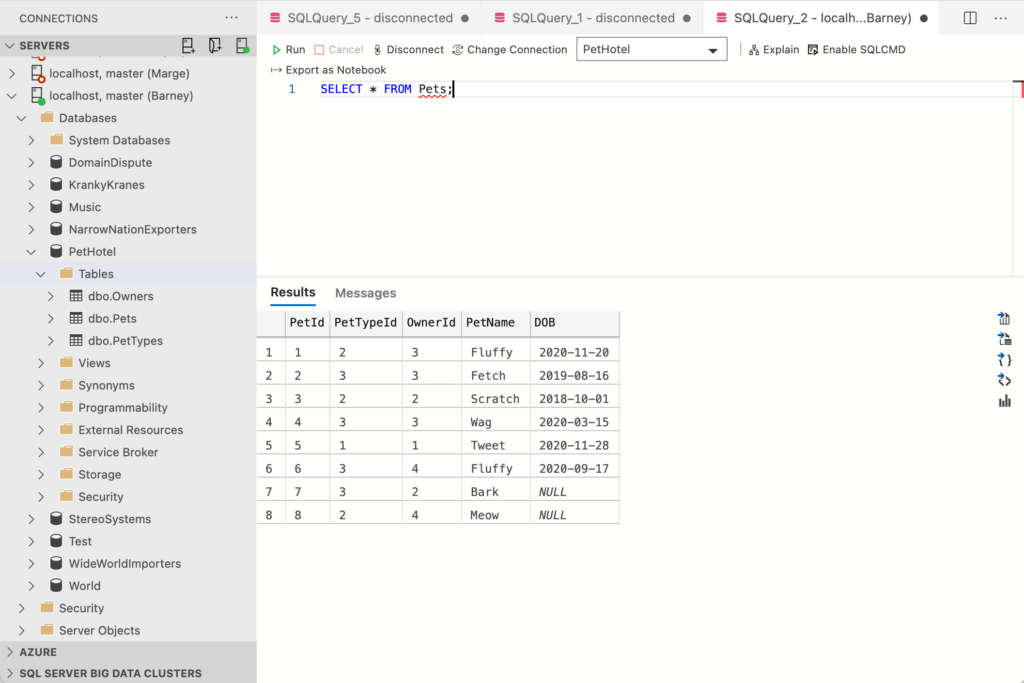
SELECT *
FROM Pets;
This is a perfect example of how easy it can be to write SQL. This simple SQL statement actually does a lot. It returns the whole table. It returns all columns and all rows from the table called Pets.
The asterisk (*) is a wildcard character, which means “all columns”. It’s a quick and easy way to get all columns without having to type them all out.
That’s one of the beautiful things about SQL. The simplest SQL queries are usually the most powerful. If we wanted to return less data, we would actually need to write more.
For example, if we only wanted pets named Fetch, we would add a WHERE clause that stipulated that requirement.
Like this:
SELECT *
FROM Pets
WHERE PetName = 'Fetch';
The WHERE clause filters our query to just the rows where the PetName column has a value of Fetch.
This query assumes that there is a column called PetName and a table called Pets in the database.
In this SQL tutorial, I’ll show you how to create such a database using SQL.
I’ll also show you how to insert data into that database, update data, delete data, and run queries against it.
What is SQL?
SQL is an acronym for Structured Query Language.
SQL is the standard query language used for working with relational databases.
SQL is used by all the major Relational Database Management Systems (RDBMSs), including:
What Can I Do with SQL?
You can use SQL to run queries against a database, insert records, update records, and delete records. You can also create new database objects such as databases and tables. You can also perform database administration tasks, such as creating logins, automated jobs, database backups, and much more.
Even when you do stuff using a Graphical User Interface (GUI), your Database Management System (DBMS) will almost certainly use SQL behind the scenes to carry out that task.
For example, when you create a database by clicking Create Database and entering the details of the new database into a dialog box, once you click OK or Create or whatever the button reads, your database system will use the SQL CREATE DATABASE statement to go ahead and create the database as specified.
The same is true for other tasks, such as running queries, inserting data, etc.
SQL also enables you to perform more advanced actions such as creating stored procedures (self contained scripts), views (pre-made queries), and setting permissions on database objects (such as tables, stored procedures, and views).
That said, you don’t need to learn all the advanced stuff in order to get started with SQL. The good thing about SQL is that, some of the most common tasks are the easiest to write.
SQL Standard
SQL was standardised in ANSI X3.135 in 1986, and, within a few months, it was adopted by ISO as ISO 9075-1987. The international standard (now ISO/IEC 9075) has been revised periodically ever since, and it currently exists in 9 parts.
Most major database vendors tend to adhere to the SQL standard. The good thing about that is that you don’t have to learn a new query language every time you learn a new DBMS.
In practice though, there are variations between how each database vendor implements the SQL standard. Therefore, code that you write in one DBMS might not always work in another without the need for modifications.
The good news is that all major DBMSs support the most common tasks in generally the same way.
SQL Pronunciation
SQL is typically pronounced in one of two ways:
- “ess-que-el” (i.e. spelling out each letter)
- “sequel” (as in the original spelling/pronunciation).
See Is it Pronounced S-Q-L or Sequel if you’re wondering why.
What Do I Need for this SQL Tutorial?
To really benefit from this SQL tutorial, you should follow along with the examples. That means you’ll need somewhere to enter the SQL queries. You’ll need to have something like this:
If you’re going to run SQL queries, you’ll need:
- An RDBMS installed (such as SQL Server, MySQL, PostgreSQL, SQLite, etc).
- A database tool that allows you to run SQL queries against that RDBMS (such as MySQL WorkBench, Azure Data Studio (pictured), DBeaver, and SSMS).
If you already have one of each installed, great! You can continue on with the tutorial.
If you don’t have these installed, see What Do I Need to Run SQL? for instructions on installing an RDBMS and its relevant database management tool, before returning to this SQL tutorial.
Create a Database
Once you’ve installed your RDBMS and the appropriate database tool, you’re ready to create a database:
CREATE DATABASE PetHotel;Done!
That statement actually created a database. An empty database, but a database nonetheless.
This database will contain the tables and data used in this SQL tutorial. When we create a table or insert data, we will do it inside this database.
I should mention that SQLite uses a different syntax for creating databases. If you’re using SQLite, here’s how to create a database in SQLite.
Connect to the Database
Before you start creating tables, inserting data, and so on, you need to be sure that you’re in the right database. Creating a database (like we just did) doesn’t necessarily connect you to that database.
In many DBMSs (such as SQL Server, MySQL and MariaDB), we can use the following to switch over to the specified database:
USE PetHotel;That makes PetHotel the current database.
In SQLite, you’re probably already in the database after creating it. If not, you can attach the database (which will also create it if it doesn’t already exist):
ATTACH DATABASE 'PetHotel.db' AS Pets;In PostgreSQL, if you’re using the psql tool, you can use the following:
\connect PetHotelOr the shortened version:
\c PetHotelI should mention that the process of creating and connecting to databases can differ widely between DBMSs.
Fortunately, most GUI tools let you connect to a database by either double-clicking on the database, or right-clicking on the database name and selecting a new query tab from the context menu. If you find yourself stuck at this step, just use the GUI to create and/or connect to your DB.
Create a Table
Now that you’ve connected to the right database, you can go ahead and create some tables.
To create a table in SQL, use the CREATE TABLE statement.
When you create a table, you need to specify what columns will be in the table, as well as their data types. You can also specify other details, but let’s not get ahead of ourselves.
Let’s create a table:
CREATE TABLE PetTypes
(
    PetTypeId   int NOT NULL PRIMARY KEY,
    PetType     varchar(60) NOT NULL
);
In this case we create a table called PetTypes. We know that, because the table name comes immediately after the CREATE TABLE bit.
After that comes a list of columns, enclosed in parentheses.
The above table contains the following columns:
PetIdIdPetType
Each column is followed by its data type:
intmeans that this column accepts integers. As far as I’m aware, most major DBMSs support declaring columns asint. If you have any problems, try usinginteger.varchar(60)means that this column accepts strings up to 60 characters long.varcharcolumns are variable-length strings. Another string data type ischar(which is a fixed-length string). If you have problems trying to define a column asvarchar(60), try usingchar(60).
NOT NULL Constraints
In this example, both columns are defined with NOT NULL constraints. The NOT NULL constraint means that this column cannot be empty. When a new row is inserted, any NOT NULL columns must contain a value. Other columns can remain empty if there’s no data for those columns.
If NULL values are allowed in the column, you can either omit the NOT NULL part, or declare it as NULL (meaning, NULL values are allowed in this column).
Some DBMSs (such as DB2) don’t support the NULL keyword anyway, and so you will need to omit it when working with such DBMSs.
Primary Keys
We also made the PetTypeId column the primary key. The primary key is one or more columns that uniquely identifies each row in the table. You specify your selected column/s as the primary key by using a primary key constraint. You can do this in the CREATE TABLE statement (like we did here), or you can add one later with an ALTER TABLE statement.
Primary keys must contain unique values. That is, for each row in that table, the value in the primary key column/s must be different in each row. This could be as simple as having incrementing numbers (like 1, 2, 3… etc) or it could be a product code (like pr4650, pr2784, pr5981… etc).
Also, primary keys must contain a value. It cannot be NULL.
Although primary keys are not required, it’s generally considered good practice to define a primary key on each table.
Create More Tables
Let’s create two more tables:
CREATE TABLE Owners
(
    OwnerId     int NOT NULL PRIMARY KEY,
    FirstName   varchar(60) NOT NULL,
    LastName    varchar(60) NOT NULL,
    Phone       varchar(20) NOT NULL,
    Email       varchar(254)
);

CREATE TABLE Pets
(
    PetId       int NOT NULL PRIMARY KEY,
    PetTypeId   int NOT NULL REFERENCES PetTypes (PetTypeId),
    OwnerId     int NOT NULL REFERENCES Owners (OwnerId),
    PetName     varchar(60) NOT NULL,
    DOB         date NULL
);
Both of these tables are similar to the first one, except that they have more rows, and a couple of extra pieces, which I’ll explain below.
If you’re interested, check out SQL CREATE TABLE for Beginners for a few more simple examples of creating tables in SQL.
Relationships
When we created our Pets table, we actually created a relationship between the three tables.
That relationship is depicted in the following diagram.
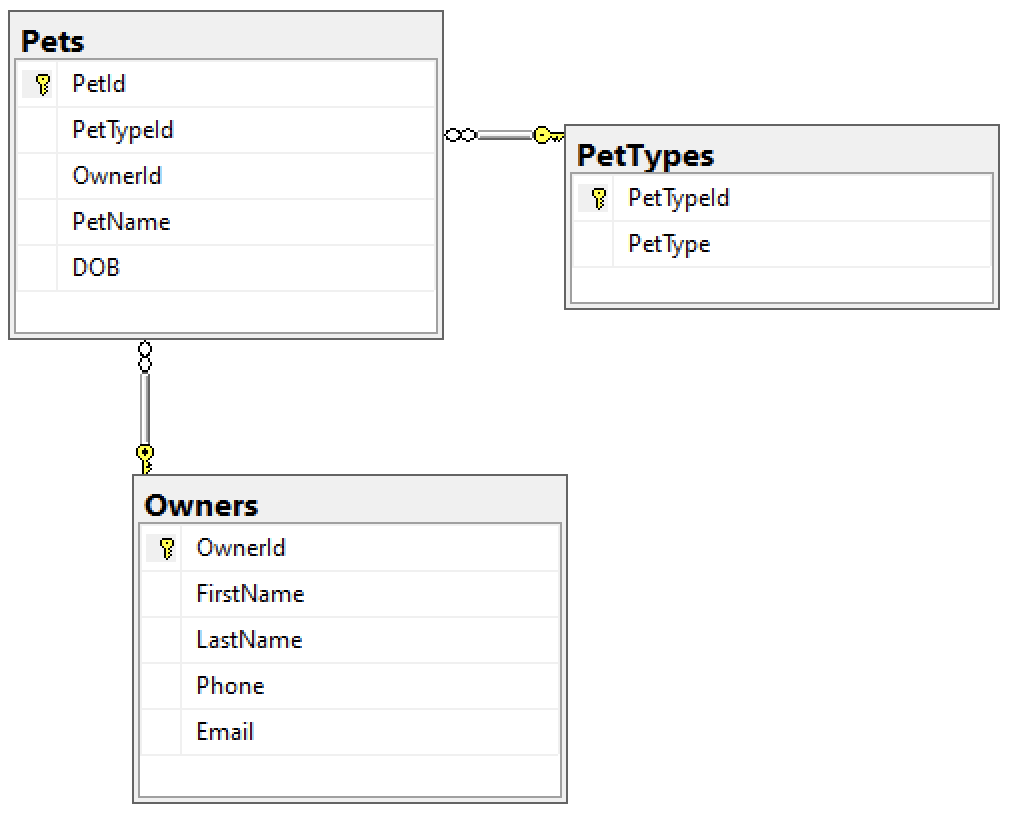
Database relationships are a crucial part of SQL. Relationships allow us to query multiple tables for related data and get accurate and consistent results.
In our case, we want to be able to search for pets by owner, or pets by pet type, etc. And we want our results to be accurate and consistent.
To achieve this, we need to insist that all pets are entered along with their owner and pet type. Therefore we need to ensure that, whenever a new pet is added to the Pets table, there’s already a corresponding owner in the Owners table, and a corresponding pet type in the PetTypes table.
Basically, our requirements are as follows:
- Any value in the
Pets.PetTypeIdcolumn must match a value in thePetTypes.PetTypeIdcolumn. - Any value in the
Pets.OwnerIdcolumn must match a value in theOwners.OwnerIdcolumn.
We can ensure the above requirements by creating a foreign key constraint against the applicable columns. A foreign key constraint is used to specify that a certain column references the primary key of another table.
The above code did indeed create two foreign key constraints on the Pets table.
Notice that the PetTypeId and OwnerId columns have some extra code that starts with REFERENCES.... Those are the parts that created the two foreign keys.
When we created the Pets table, its PetTypeId column has a bit that goes REFERENCES PetTypes (PetTypeId). This means that the Pets.PetTypeId column references the PetTypeId column in the PetTypes table.
It’s the same deal for the OwnerId column. It references the OwnerId column of the Owners table.
In most DBMSs, foreign keys can be also created on an existing table, by using the ALTER TABLE statement, but we won’t go over that here. See How to Create a Relationship in SQL for more about that.
Anyway, our foreign keys have been created. Now, whenever someone inserts a new pet into the Pets table, the PetTypeId and OwnerId values will need to have a corresponding value in the PetTypes and Owners tables respectively. If any of them don’t, the database will return an error.
This is the benefit of foreign keys. It helps to prevent bad data being entered. It helps to maintain data integrity and more specifically, referential integrity.
Check Constraints
A check constraint is another constraint type you should be aware of. A check constraint checks data before it enters the database. When a table has a check constraint enabled, data can only enter the table if it doesn’t violate that constraint. Data that violates the constraint cannot enter the table.
For example, you might create a check constraint on a Price column to ensure that it only accepts values that are greater than zero. Or we could apply a check constraint to our Pets table to ensure that the DOB column is not in the future.
For an example, see What is a CHECK Constraint?
Whitespace
You may have noticed that my examples include whitespace. For example, I’ve spaced out the code across multiple lines, and I’ve used tabs to indent the data types, etc.
This is perfectly valid in SQL. You can safely do this, and it won’t affect the outcome. SQL allows you to spread your code across multiple lines if you wish, and it allows you to use multiple spaces or tabs to improve readability.
Comments
You can also include comments within your code. Comments can be handy once you start writing longer SQL scripts. Once a script gets quite long, comments can make it easier to quickly identify what each part does.
Inline Comments
You can create inline comments by prefixing your comment with two hyphen characters (--):
SELECT * FROM Pets; --This is a comment

-- This is a comment
SELECT * FROM Owners;
In this example, both queries will run without any problems. The comments will be ignored by the DBMS.
Multiline Comments
You can spread comments over multiple lines by surrounding the comment with /* and */:
/*
This is a longer comment so
it's spread across multiple lines
*/
SELECT * FROM Pets;
In this example, both queries will run without any problems. The comments will be ignored by the DBMS.
MySQL
If you’re using MySQL, you can also use the number sign/hash sign (#) for single line comments.
# This is a comment
SELECT * FROM Pets;
Commenting Out Code
Another cool benefit of comments is that you can comment out code. For example, if you have a long SQL script that does many things, but you only want to run one or two parts of it, you can comment out the rest of the script.
Here’s an example:
-- SELECT * FROM Pets;

SELECT * FROM Owners;
In this case, the first SELECT statement has been commented out, and so only the second SELECT statement will run.
You can also use multiline comments for this technique.
Insert Data
Now that we’ve created three tables and created the appropriate foreign keys, we can go ahead and add data.
The most common way to insert data in SQL is with the INSERT statement. It goes something like this:
INSERT INTO MyTable( Column1, Column2, Column3, ... )
VALUES( Value1, Value2, Value3, ... );
You simply replace MyTable with the name of the table that you’re inserting data into. Likewise, you replace Column1, etc with the column names, and Value1, etc with the values that go into those columns.
For example, we could do this:
INSERT INTO Pets( PetId, PetTypeId, OwnerId, PetName, DOB )
VALUES( 1, 2, 3, 'Fluffy', '2020-12-20' );
Each value is in the same order that the column is specified.
Note that the column names match the names we used when we created the table.
You can omit the column names if you’re inserting data into all columns. So we could change the above example to look like this:
INSERT INTO Pets
VALUES( 1, 2, 3, 'Fluffy', '2020-12-20' );
For this tutorial, we’ll be adding quite a few more rows, so we’ll add more INSERT INTO statements – one for each row we want to insert.
So let’s go ahead and populate our tables.
INSERT INTO Owners( OwnerId, FirstName, LastName, Phone, Email )
VALUES( 1, 'Homer', 'Connery', '(308) 555-0100', '[email protected]' );
INSERT INTO Owners(OwnerId, FirstName, LastName, Phone, Email)
VALUES( 2, 'Bart', 'Pitt', '(231) 465-3497', '[email protected]' );
INSERT INTO Owners(OwnerId, FirstName, LastName, Phone)
VALUES( 3, 'Nancy', 'Simpson', '(489) 591-0408' );
INSERT INTO Owners(OwnerId, FirstName, LastName, Phone)
VALUES( 4, 'Boris', 'Trump', '(349) 611-8908' );

INSERT INTO PetTypes( PetTypeId, PetType )
VALUES( 1, 'Bird' );
INSERT INTO PetTypes( PetTypeId, PetType )
VALUES( 2, 'Cat' );
INSERT INTO PetTypes( PetTypeId, PetType )
VALUES( 3, 'Dog' );
INSERT INTO PetTypes( PetTypeId, PetType )
VALUES( 4, 'Rabbit' );

INSERT INTO Pets( PetId, PetTypeId, OwnerId, PetName, DOB )
VALUES( 1, 2, 3, 'Fluffy', '2020-11-20' );
INSERT INTO Pets( PetId, PetTypeId, OwnerId, PetName, DOB )
VALUES( 2, 3, 3, 'Fetch', '2019-08-16' );
INSERT INTO Pets( PetId, PetTypeId, OwnerId, PetName, DOB )
VALUES( 3, 2, 2, 'Scratch', '2018-10-01' );
INSERT INTO Pets( PetId, PetTypeId, OwnerId, PetName, DOB )
VALUES( 4, 3, 3, 'Wag', '2020-03-15' );
INSERT INTO Pets( PetId, PetTypeId, OwnerId, PetName, DOB )
VALUES( 5, 1, 1, 'Tweet', '2020-11-28' );
INSERT INTO Pets( PetId, PetTypeId, OwnerId, PetName, DOB )
VALUES( 6, 3, 4, 'Fluffy', '2020-09-17' );
INSERT INTO Pets( PetId, PetTypeId, OwnerId, PetName )
VALUES( 7, 3, 2, 'Bark' );
INSERT INTO Pets( PetId, PetTypeId, OwnerId, PetName )
VALUES( 8, 2, 4, 'Meow' );
Notice that we populated the Pets table last. There’s a reason for this.
If we had tried to insert data into the Pets table before populating the other two, we would have received an error, due to our foreign key constraint. And for good reason. After all, we would’ve been trying to insert values in the foreign key columns that didn’t yet exist in the primary key columns on the other tables. That’s a big “no no” when it comes to foreign keys.
So by populating the Owners and PetTypes tables first, we ensured that the appropriate values were already in the primary key columns before we populated the foreign key columns in the Pets table.
See SQL INSERT for Beginners for more examples of inserting data into tables.
Check Our Data
Phew! Finally we can start running queries against our database.
Let’s check the data in all our tables.
SELECT * FROM Pets;
SELECT * FROM PetTypes;
SELECT * FROM Owners;
Result:
+---------+-------------+-----------+-----------+------------+
| PetId   | PetTypeId   | OwnerId   | PetName   | DOB        |
|---------+-------------+-----------+-----------+------------|
| 1       | 2           | 3         | Fluffy    | 2020-11-20 |
| 2       | 3           | 3         | Fetch     | 2019-08-16 |
| 3       | 2           | 2         | Scratch   | 2018-10-01 |
| 4       | 3           | 3         | Wag       | 2020-03-15 |
| 5       | 1           | 1         | Tweet     | 2020-11-28 |
| 6       | 3           | 4         | Fluffy    | 2020-09-17 |
| 7       | 3           | 2         | Bark      | NULL       |
| 8       | 2           | 4         | Meow      | NULL       |
+---------+-------------+-----------+-----------+------------+
(8 rows affected)
+-------------+-----------+
| PetTypeId   | PetType   |
|-------------+-----------|
| 1           | Bird      |
| 2           | Cat       |
| 3           | Dog       |
| 4           | Rabbit    |
+-------------+-----------+
(4 rows affected)
+-----------+-------------+------------+----------------+-------------------+
| OwnerId   | FirstName   | LastName   | Phone          | Email             |
|-----------+-------------+------------+----------------+-------------------|
| 1         | Homer       | Connery    | (308) 555-0100 | [email protected] |
| 2         | Bart        | Pitt       | (231) 465-3497 | [email protected]  |
| 3         | Nancy       | Simpson    | (489) 591-0408 | NULL              |
| 4         | Boris       | Trump      | (349) 611-8908 | NULL              |
+-----------+-------------+------------+----------------+-------------------+
(4 rows affected)
Great, so it looks like the data was successfully inserted.
Select Specific Columns
It’s generally considered bad practice to select all rows and all columns from a table (like we did in the previous example), unless you really need to. Doing this can impact on the performance of your database server, especially if there are a lot of rows in the table.
It’s not an issue when you’re using small data sets like we are here, or if you’re in a development environment or similar. Otherwise, it’s usually better to select just the columns you require.
Therefore, if we wanted the IDs, names and dates of birth of all pets, we could do this:
SELECT PetId, PetName, DOB
FROM Pets;
Result:
+---------+-----------+------------+
| PetId   | PetName   | DOB        |
|---------+-----------+------------|
| 1       | Fluffy    | 2020-11-20 |
| 2       | Fetch     | 2019-08-16 |
| 3       | Scratch   | 2018-10-01 |
| 4       | Wag       | 2020-03-15 |
| 5       | Tweet     | 2020-11-28 |
| 6       | Fluffy    | 2020-09-17 |
| 7       | Bark      | NULL       |
| 8       | Meow      | NULL       |
+---------+-----------+------------+
If we wanted the IDs, and date of birth of all pets named Fluffy, we could use this:
SELECT PetId, DOB
FROM Pets
WHERE PetName = 'Fluffy';
Result:
+---------+------------+
| PetId   | DOB        |
|---------+------------|
| 1       | 2020-11-20 |
| 6       | 2020-09-17 |
+---------+------------+
You can also use the SELECT statement to return no-table data. That is, it can return data that isn’t stored in a table. See SQL SELECT Statement for Beginners to see an example.
Sorting
SQL provides the ORDER BY clause that enables us to sort data.
We can add an ORDER BY clause to our earlier example so that the pets are sorted by their names:
SELECT PetId, PetName, DOB
FROM Pets
ORDER BY PetName ASC;
Result:
+---------+-----------+------------+
| PetId   | PetName   | DOB        |
|---------+-----------+------------|
| 7       | Bark      | NULL       |
| 2       | Fetch     | 2019-08-16 |
| 1       | Fluffy    | 2020-11-20 |
| 6       | Fluffy    | 2020-09-17 |
| 8       | Meow      | NULL       |
| 3       | Scratch   | 2018-10-01 |
| 5       | Tweet     | 2020-11-28 |
| 4       | Wag       | 2020-03-15 |
+---------+-----------+------------+
The ASC part means ascending. When you use the ORDER BY clause, it defaults to ascending, so you can omit the ASC part if you wish.
To sort it in descending order, use DESC.
SELECT PetId, PetName, DOB
FROM Pets
ORDER BY PetName DESC;
Result:
+---------+-----------+------------+
| PetId   | PetName   | DOB        |
|---------+-----------+------------|
| 4       | Wag       | 2020-03-15 |
| 5       | Tweet     | 2020-11-28 |
| 3       | Scratch   | 2018-10-01 |
| 8       | Meow      | NULL       |
| 1       | Fluffy    | 2020-11-20 |
| 6       | Fluffy    | 2020-09-17 |
| 2       | Fetch     | 2019-08-16 |
| 7       | Bark      | NULL       |
+---------+-----------+------------+
You can also sort the results using multiple columns. It will sort by the first column specified, then if there are any duplicates in that column, it will sort those duplicates by the second column specified, and so on.
SELECT PetId, PetName, DOB
FROM Pets
ORDER BY PetName DESC, DOB ASC;
Result:
+---------+-----------+------------+
| PetId   | PetName   | DOB        |
|---------+-----------+------------|
| 4       | Wag       | 2020-03-15 |
| 5       | Tweet     | 2020-11-28 |
| 3       | Scratch   | 2018-10-01 |
| 8       | Meow      | NULL       |
| 6       | Fluffy    | 2020-09-17 |
| 1       | Fluffy    | 2020-11-20 |
| 2       | Fetch     | 2019-08-16 |
| 7       | Bark      | NULL       |
+---------+-----------+------------+
See how the two Fluffys have swapped their position.
If you don’t use the ORDER BY clause, there’s no guarantee what order your results will be in. Although it may look like your database is sorting the results by a particular column, this may not actually be the case. In general, without an ORDER BY clause, data will be sorted in the order the in which it was loaded into the table. However, if rows have been deleted or updated, the order will be affected by how the DBMS reuses reclaimed storage space.
Therefore, don’t rely on the DBMS to sort the results in any meaningful order.
Bottom line: If you want your results to be sorted, use ORDER BY.
See SQL ORDER BY Clause for Beginners for more examples.
Count the Rows in a Result Set
You can use the COUNT() aggregate function to count the rows that will be returned in a query.
SELECT COUNT(*) AS Count
FROM Pets;
Result:
+---------+
| Count   |
|---------|
| 8       |
+---------+
This tells us that there’s 8 rows in the table. We know that because we selected all rows and all columns.
You can use COUNT() on any query, for example queries that use a WHERE clause to filter the results.
You can also specify a particular column to count. The COUNT() function only counts non-NULL results, so if you specify a column that contains NULL values, those values won’t be counted.
Here’s an example to demonstrate what I mean.
SELECT COUNT(DOB) AS Count
FROM Pets;
Result:
+---------+
| Count   |
|---------|
| 6       |
+---------+
Warning: Null value is eliminated by an aggregate or other SET operation.
You may recall that the Pets table contains two NULL values in the DOB column (two pets haven’t supplied their date of birth), and so COUNT(DOB) returns 6, instead of 8 when we used COUNT(*). The reason COUNT(*) returned all rows, is because those two rows did have data in the other columns.
In my example, my DBMS also returned a warning about this. You may or may not get a warning, depending on your DBMS and your specific configuration.
See SQL COUNT for Beginners for more examples.
Other aggregate functions include: AVG(), SUM(), MIN(), and MAX().
Group By
Another useful clause is the GROUP BY clause. This does pretty much what its name promises. It allows you to group the results by a given column.
SELECT
    PetTypeId,
    COUNT(PetTypeId) AS Count
FROM Pets
GROUP BY PetTypeId
ORDER BY Count DESC;
Result:
+-------------+---------+
| PetTypeId   | Count   |
|-------------+---------|
| 3           | 4       |
| 2           | 3       |
| 1           | 1       |
+-------------+---------+
In this example, we are counting how many pets we have for each pet type, then sorting it in descending order (with the highest count at the top).
See SQL GROUP BY Clause for Beginners for more examples.
The HAVING Clause
We can use the HAVING clause to filter the results in the GROUP BY clause. The HAVING clause returns rows where aggregate values meet specified conditions.
Here’s an example.
SELECT
    PetTypeId,
    COUNT(PetTypeId) AS Count
FROM Pets
GROUP BY PetTypeId
HAVING COUNT(PetTypeId) > 2
ORDER BY Count DESC;
Result:
+-------------+---------+
| PetTypeId   | Count   |
|-------------+---------|
| 3           | 4       |
| 2           | 3       |
+-------------+---------+
In this case, we returned data for just the pet types that have more than 2 pets assigned to that type.
See SQL HAVING Clause for Beginners for more examples.
Joins
In SQL, a join is where you run a query that combines data from multiple tables.
The previous two examples are OK, but they’d be better if they returned the actual pet types (e.g. Cat, Dog, Bird, etc) rather than the ID (e.g. 1, 2, 3, etc).
The only problem is, the Pets table doesn’t contain that data. That data is in the PetTypes table.
Fortunately for us, we can do a join between these two tables. Here’s an example that uses a LEFT JOIN:
SELECT
    PetTypes.PetType,
    COUNT(Pets.PetTypeId) AS Count
FROM Pets
LEFT JOIN PetTypes
ON Pets.PetTypeId = PetTypes.PetTypeId
GROUP BY PetTypes.PetType
ORDER BY Count DESC;
Result:
+-----------+---------+
| PetType   | Count   |
|-----------+---------|
| Dog       | 4       |
| Cat       | 3       |
| Bird      | 1       |
+-----------+---------+
This result set is much easier to read than the previous ones. It’s easier to understand how many of each pet type is in the table.
The syntax uses the join type (in this case LEFT JOIN), followed by the first (left) table, followed by ON, followed by the join condition.
Let’s use an INNER JOIN to return all pet names with their respective pet types.
SELECT
    Pets.PetName,
    PetTypes.PetType
FROM Pets
INNER JOIN PetTypes
ON Pets.PetTypeId = PetTypes.PetTypeId;
Result:
+-----------+-----------+
| PetName   | PetType   |
|-----------+-----------|
| Fluffy    | Cat       |
| Fetch     | Dog       |
| Scratch   | Cat       |
| Wag       | Dog       |
| Tweet     | Bird      |
| Fluffy    | Dog       |
| Bark      | Dog       |
| Meow      | Cat       |
+-----------+-----------+
Joins really open up our options, because we can now grab data from multiple tables and present it as if it were a single table.
You’ll notice that in the join examples, we qualify our column names with the table names. The reason we do this is to avoid any ambiguity regarding the column column names between the tables. Both tables could have columns of the same name (like in our example), and in such cases, the DBMS won’t know which column you’re referring to. Prefixing the column names with their table names ensures that you’re referencing the right column, and prevents any errors that could result from any ambiguity about which column you’re referring to.
See my SQL Joins Tutorial for more examples and an explanation of the various join types.
Aliases
We can go a step further and assign an alias to each table name and column name.
SELECT
    p.PetName AS Pet,
    pt.PetType AS "Pet Type"
FROM PetTypes pt
LEFT JOIN Pets p
ON p.PetTypeId = pt.PetTypeId;
Result:
+---------+------------+
| Pet     | Pet Type   |
|---------+------------|
| Tweet   | Bird       |
| Fluffy  | Cat        |
| Scratch | Cat        |
| Meow    | Cat        |
| Fetch   | Dog        |
| Wag     | Dog        |
| Fluffy  | Dog        |
| Bark    | Dog        |
| NULL    | Rabbit     |
+---------+------------+
This has resulted in new column headers, plus the code is more concise.
An alias allows you to temporarily assign another name to a table or column for the duration of a SELECT query. This can be particularly useful when tables and/or columns have very long or complex names.
An alias is assigned through the use of the AS keyword, although this keyword is optional, so you can safely omit it. Note that Oracle doesn’t support the AS keyword on table aliases (but it does on column aliases).
In the above example, I’ve included the AS keyword when assigning the column aliases, but omitted it when assigning the table aliases.
An alias name could be anything, but is usually kept short for readability purposes.
In our case, we changed the two tables to p and pt, and the column names to Pet and Pet Type. Note that I surrounded Pet Type in double quotes. I did this, because there’s a space in the name. For aliases without spaces, you don’t need to do this. In SQL Server, you can alternatively use square brackets ([]) instead of double quotes (although it also supports double quotes).
The practice of using spaces in columns and aliases is generally discouraged, as it can cause all sorts of problems with some client applications.
Note that we still needed to use the full column names when referencing them in the join (after the ON keyword).
I should point out that assigning an alias does not actually rename the column or table.
See SQL Alias Explained for more examples.
Updating Data
You can use the UPDATE statement to update data in your tables.
The basic syntax is pretty simple:
UPDATE Owners
SET LastName = 'Stallone'
WHERE OwnerId = 3;
In that example, we update the LastName column to have a new value of Stallone where the OwnerId is 3.
To update multiple columns, use a comma to separate each column/value pair.
But whatever you do, don’t forget the WHERE clause (unless you actually intend to update every row in the table with the same value).
See SQL UPDATE for Beginners for more examples and a more detailed explanation.
Deleting Data
You can use the DELETE statement to delete data from your tables.
The basic syntax is even more simple than the UPDATE statement:
DELETE FROM Owners
WHERE OwnerId = 5;
Here, we’re deleting owner number 5 from the Owners table.
As with the UPDATE statement, don’t forget the WHERE clause (unless you intend to delete every row in the table).
See SQL DELETE for Beginners for more examples and a detailed explanation.
Dropping Objects
While we’re on the subject of deleting things, when you delete a database object (such as a table, view, stored procedure, etc), it’s said that you “drop” that object. For example, if you no longer need a table, you “drop it”.
The syntax is extremely simple, and it goes like this:
DROP TABLE Customers;Those three words completely obliterated a table called Customers. The table and all its data is now gone.
As you can imagine, this can be a very dangerous statement, and should be used with extreme caution.
The same syntax can be used for other object types, except you would replace table with the object type (for example DROP VIEW vPets drops a view called vPets).
If you try to drop a table that is referenced by a foreign key, you’ll probably get an error. In this case, you’ll need to either drop the foreign key (using the ALTER TABLE statement) or the child table itself.
SQL Operators
In SQL, an operator is a symbol specifying an action that is performed on one or more expressions.
Operators manipulate individual data items and return a result. The data items are called operands or arguments. In SQL, operators are represented by special characters or by keywords.
We’ve already seen some operators in action. Some of our previous example queries had a WHERE clause that included the Equals operator (=). We also ran a query that used the Greater Than operator (>). These are both comparison operators – they compare two expressions.
See 12 Commonly Used Operators in SQL for examples of operators that you’re likely to need when working with SQL.
You can also use this list of SQL Operators as a reference for the operators available in SQL.
SQL Views
In SQL, a view is a query that’s saved to the database as a database object (just like a table). The term can also be used to refer to the result set of a stored query. Views are often referred to as virtual tables.
To create a view, you write a query, then save it as a view. You do this using the CREATE VIEW syntax.
Here’s an example of creating a view:
CREATE VIEW vPetTypeCount AS
SELECT
    PetTypes.PetType,
    COUNT(Pets.PetTypeId) AS Count
FROM Pets
LEFT JOIN PetTypes
ON Pets.PetTypeId = PetTypes.PetTypeId
GROUP BY PetTypes.PetType;
Running that code creates the view and stores it as an object in the database.
We can now query the view, just like we’d query a table.
Result:
SELECT * FROM vPetTypeCount;+-----------+---------+ | PetType | Count | |-----------+---------| | Bird | 1 | | Cat | 3 | | Dog | 4 | +-----------+---------+
So we get the same result as we would have got if we’d run the original query, but saving it in a view made it a lot easier to query.
This benefit would become greater, the more complex the query is.
Views and the ORDER BY Clause
One thing I should point out is that the original query had an ORDER BY clause, but I didn’t include that in the view. The SQL standard does not allow the ORDER BY clause in any view definition. Also, most RDBMSs will raise an error if you try to include an ORDER BY clause.
This isn’t a problem though, because you can sort the results when you query the view. Therefore, we can do something like this:
SELECT * FROM vPetTypeCount
ORDER BY Count DESC;
Result:
+-----------+---------+
| PetType   | Count   |
|-----------+---------|
| Dog       | 4       |
| Cat       | 3       |
| Bird      | 1       |
+-----------+---------+
Most RDBMSs also include a large set of system views that you can use to retrieve information about the system.
For more about views, see What is a View?
Stored Procedures
A stored procedure is a series of SQL statements compiled and saved to the database. Stored procedures are similar to views in some respects, but very different in other respects.
One of the benefits of stored procedures is that they allow you to store complex scripts on the server. Stored procedures often contain conditional programming such as IF... ELSE statements, for example. Stored procedures can also accept parameters.
Here’s an example of creating a simple stored procedure in SQL Server to get pet information from our database:
CREATE PROCEDURE uspGetPetById
    @PetId int
AS
    SET NOCOUNT ON;
    SELECT
        p.PetName,
        p.DOB,
        pt.PetType,
        CONCAT(o.FirstName, ' ', o.LastName) AS OwnerName
    FROM Pets p
    INNER JOIN PetTypes pt
    ON p.PetTypeId = pt.PetTypeId
    INNER JOIN Owners o
    ON o.OwnerId = p.OwnerId
    WHERE p.PetId = @PetId;
This stored procedure accepts a parameter called @PetId. This means that when you call the procedure, you need to pass the ID of the pet that you’d like information about. The procedure then selects data from various tables and returns it.
To call the stored procedure, use the EXECUTE statement. You can alternatively shorten it to EXEC. In PostgreSQL, use the CALL statement.
EXEC uspGetPetById @PetId = 3;Result:
+-----------+------------+-----------+-------------+
| PetName   | DOB        | PetType   | OwnerName   |
|-----------+------------+-----------+-------------|
| Scratch   | 2018-10-01 | Cat       | Bart Pitt   |
+-----------+------------+-----------+-------------+
In this case I was interested in pet number 3, and so that’s the info that I got.
I should mention that the syntax for creating stored procedures can differ quite significantly between DBMSs (as well as their implementations of various SQL statements and commands that you’d use inside a procedure), so I would suggest that you look at the documentation for your particular DBMS if you want to create a stored procedure.
Most RDBMSs also include a large set of system stored procedures that you can use to perform various administration tasks, and to retrieve information about the system.
For a basic overview of stored procedures, including their benefits, see What is a Stored Procedure?
Also, if you’re interested, see How to Create a Stored Procedure in SQL Server to see another example of creating a stored procedure in SQL Server. That example includes some screenshots.
SQL Triggers
A trigger is a special type of stored procedure that automatically executes when an event occurs in the database server.
Most major RDBMSs support DML triggers, which execute when a user tries to modify data through a data manipulation language (DML) event. DML events are INSERT, UPDATE, or DELETE statements.
Some DBMSs (such as SQL Server and PostgreSQL) allow triggers to be associated with both tables and views. Others only allow triggers to be associated with tables.
SQL Server also supports DDL triggers and logon triggers.
DDL triggers execute in response to DDL events, such as CREATE, ALTER, and DROP statements, and certain system stored procedures that perform DDL-like operations.
Logon triggers are fired in response to the LOGON event that’s raised when a user’s session is being established.
Here are some articles explaining how to do various things with triggers in SQL Server:
- Create a DML Trigger in SQL Server
- Create a “last modified” column
- Automatically send an email when someone tries to delete a record
- Update a column’s value whenever another column is updated
- Update a column’s value whenever certain other columns are updated
SQL Transactions
SQL transactions are an important part of transactional databases, where data consistency is paramount.
A transaction manages a sequence of SQL statements that must be executed as a single unit of work. This is to ensure that the database never contains the results of partial operations.
When a transaction makes multiple changes to the database, either all the changes succeed when the transaction is committed, or all the changes are undone when the transaction is rolled back.
Transactions help maintain data integrity by ensuring that a sequence of SQL statements execute completely or not at all.
A classic example of a transaction is to move money from one bank account to another. You wouldn’t want money to be deducted from the first bank account, but not appear in the second bank account.
Therefore, you could use a transaction which goes along the lines of this:
START TRANSACTION
Debit account 1
Credit account 2
Record transaction in transaction journal
END TRANSACTION
You could write conditional logic inside that transaction that rolls back the transaction if anything goes wrong.
The end result is that, either the transaction is completed in its entirety, or it’s not completed at all. It’s never half-done.
See my SQL Transactions Tutorial for examples of SQL transactions.
SQL Functions
A function is a routine that can take parameters, perform calculations or other actions, and return a result.
Most DBMSs provide you with the ability to create your own functions, while also providing a range of inbuilt functions.
User-Defined Functions
A user-defined function (UDF) is a function that you create for a specific purpose, and save to the database. You would create such a function for tasks that aren’t catered for by an inbuilt function.
See Introduction to User-Defined Functions in SQL Server for an overview. Although that article is written for SQL Server, most of the general concepts also apply to other DBMSs.
Inbuilt Functions
Most DBMSs have a large range of inbuilt functions that you can use in your SQL queries. For example, there are functions that return the current date and time, functions that format dates and numbers, functions that convert data from one data type to another, and more.
The range of inbuilt functions can be pretty extensive, and depend on the DBMS in use, so I won’t go over them in this SQL tutorial. But I would encourage you to try to find out what inbuilt functions your DBMS supports.
To get you started, the following articles contain some of the most commonly used functions in SQL programming.