Here’s a quick and easy way to install Oracle Database on a Mac.
First up, Oracle isn’t available natively on the Mac. But don’t let that stop you!
If you’re a developer, and you just want to have Oracle Database running on your local machine, there are ways to do it. In fact, Oracle provides us with a virtual appliance precisely for that purpose.
Update January 2026: Since writing this article, Oracle has made Oracle Database available for MacOS via a free container image. I have written another article on how to install Oracle 26ai on a Mac via Docker. So check it out if you prefer to use Docker instead of the method chosen below. Using the Docker image is much easier, and doesn’t require creating a virtual machine like we do in the following article.
In this tutorial, I install Oracle Database using the Oracle DB Developer VM (the VM stands for Virtual Machine). I do this via VirtualBox.
VirtualBox is a virtualisation application (also by Oracle corporation). It enables you to create virtual machines (VMs) on your computer. For example, you can use it to run Windows or Linux on a Mac, etc.
You can also use it to install Oracle on your Mac. This is because Oracle has created a virtual appliance specifically for Oracle Database (the aforementioned Oracle DB Developer VM). This appliance makes it easy to install Oracle Database on a Mac, because you don’t need to install any other operating system first. You simply import the appliance to VirtualBox. The virtual appliance comes preinstalled with Oracle Linux and Oracle Database (as well as other handy tools, such as SQL Developer, and hands-on-labs).
Below are the steps I used to install Oracle on my Mac using VirtualBox.
Install VirtualBox
If you don’t already have VirtualBox, download it from the VirtualBox website.
You can install VirtualBox just as you’d install any other software. Once the .dmg file has downloaded, open it up and double click on the VirtualBox.pkg icon. This opens the installer. Follow the prompts and close the installer once it’s installed.
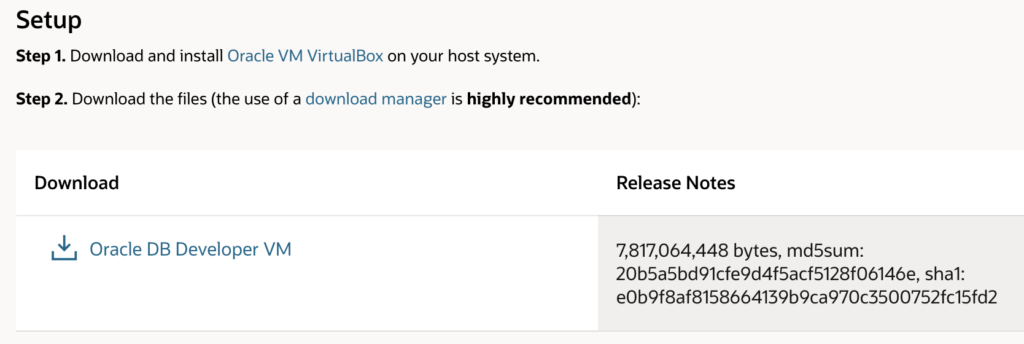
Download Oracle Database
Once you have VirtualBox installed, download Oracle DB Developer VM from the Oracle website.
Click the Oracle DB Developer VM link:
That opens up a popup window with a checkbox and a download button.
Check the box if you agree with the licence agreement, and click the Download button:
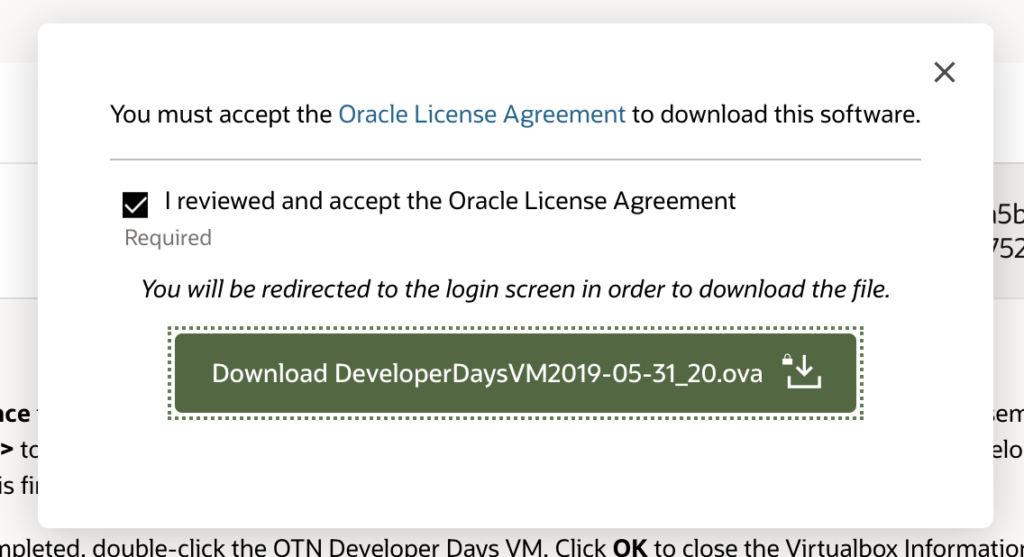
If you’re not already logged in, you might be asked to log in or create an account. Go ahead and do so.
Once done, the file will be downloaded.
It’s quite a large file (mine was 7.82 GB), so give it some time to download.
Install Oracle Database
Once the file has downloaded, you can go ahead and install Oracle Database via VirtualBox. This also installs Oracle Linux as the operating system.
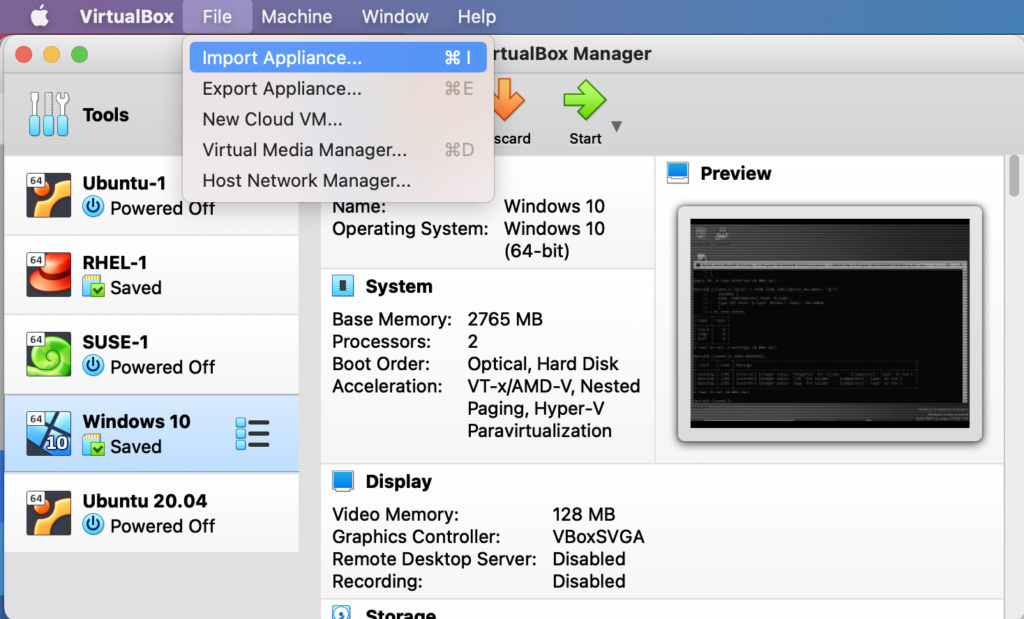
First of all, launch VirtualBox.
Once VirtualBox has launched, select File > Import Appliance...:
This opens up the following Appliance to Import screen:
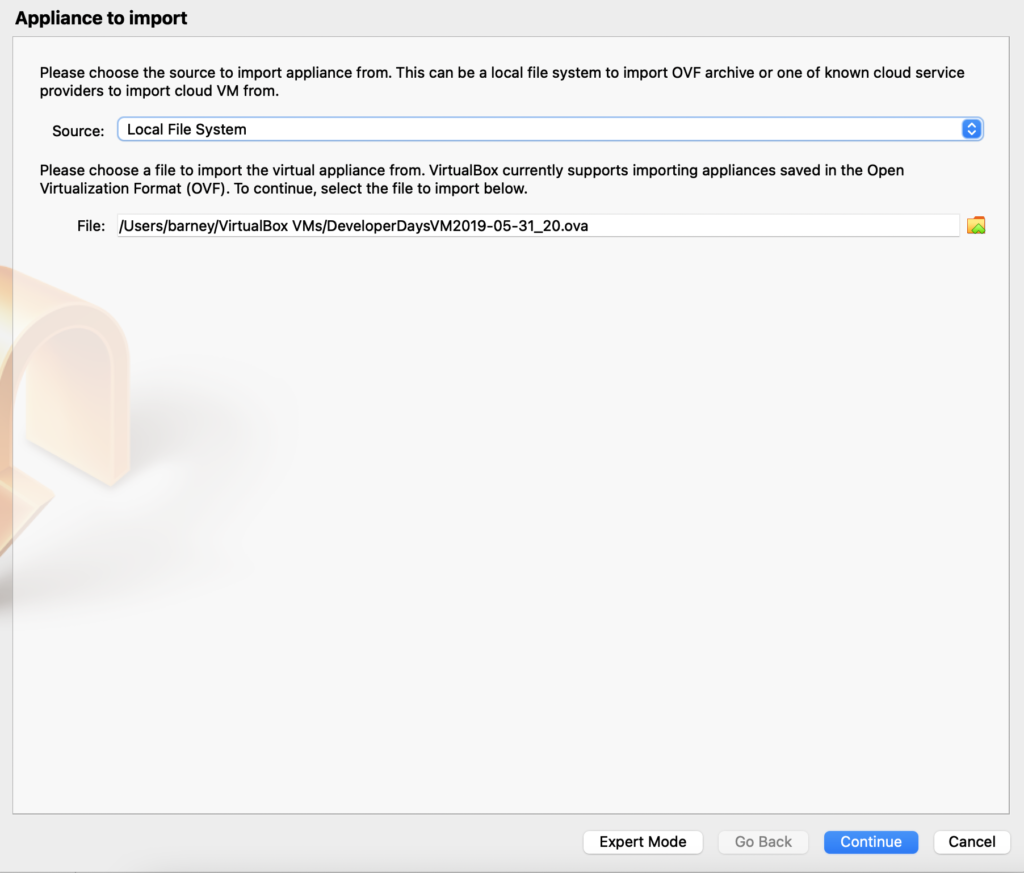
Click the yellow folder icon to navigate to the Oracle DB Developer VM file you just downloaded. It has a .ova extension.
Once you’ve selected the file, click Continue.
This brings us to the Appliance Settings screen:
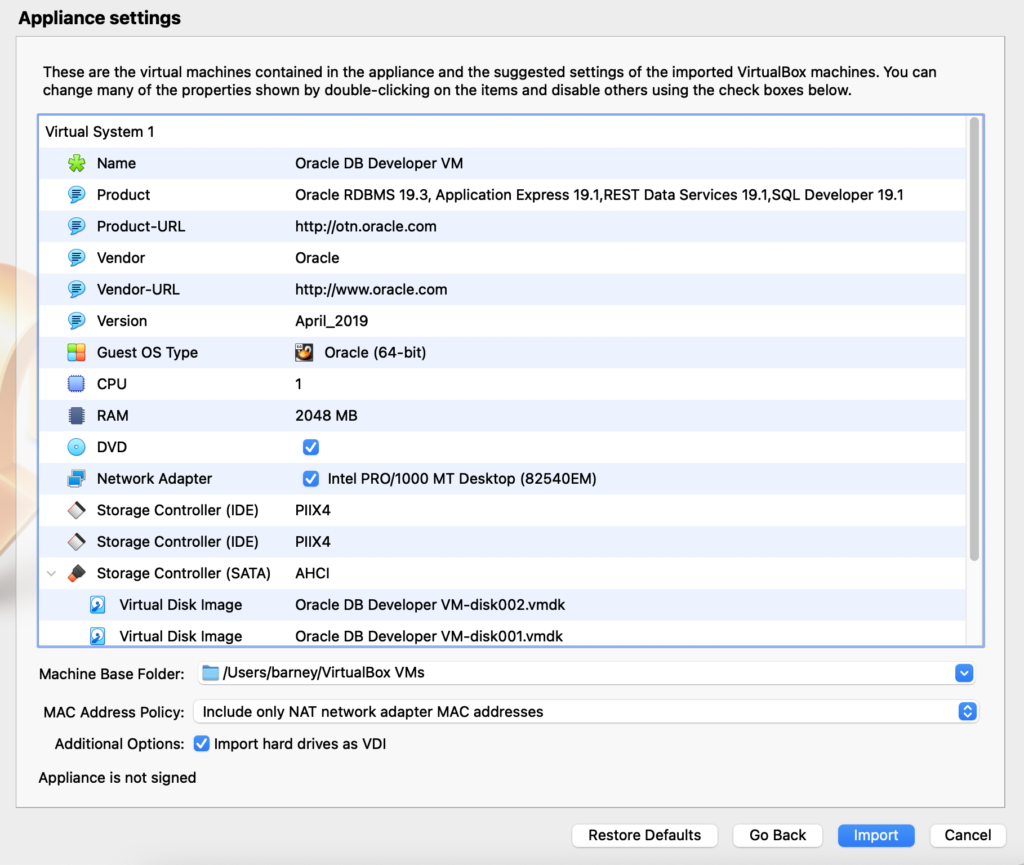
Go ahead and click Import.
This opens the following license agreement prompt:
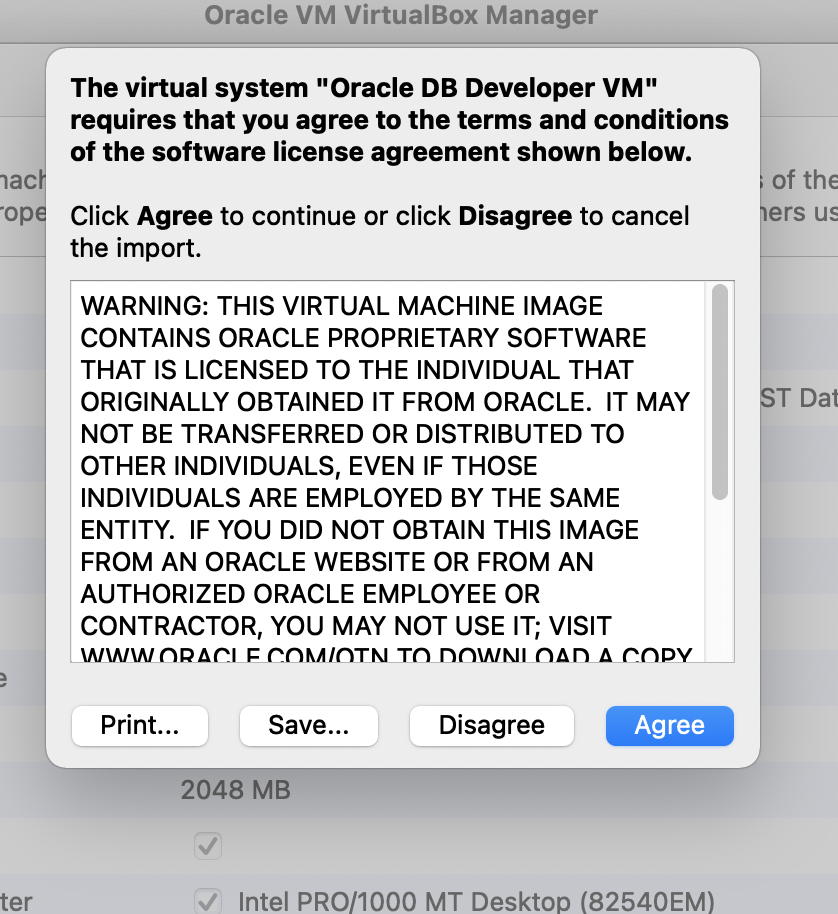
Click Agree if you agree.
This imports the virtual appliance. This is when Oracle Database is installed via VirtualBox.
The following screen is displayed while it’s importing:
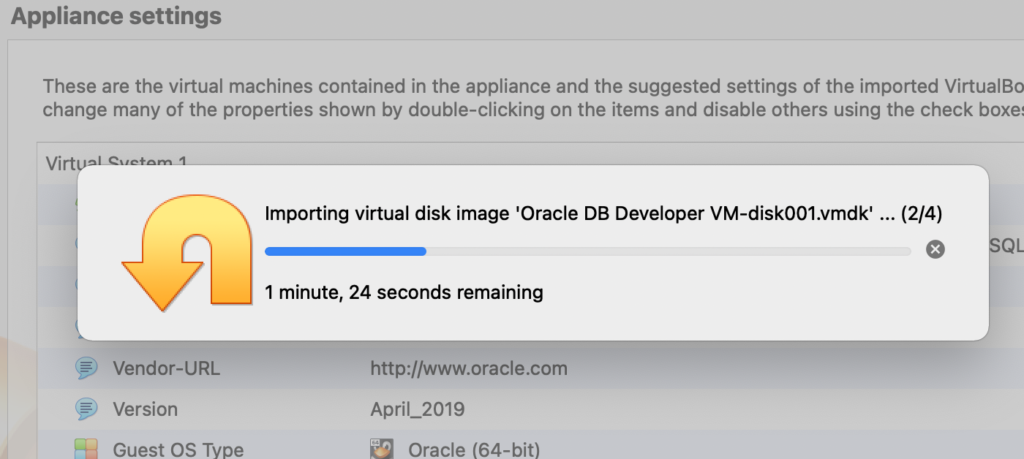
Once it’s finished, Oracle Database is installed as a virtual machine.
Launch the Oracle Database VM
After completing the previous steps, Oracle will now appear under your list of virtual machines. If this is your first virtual machine, it will be the only one listed. If not, you’ll see it listed along with your other virtual machines.
Here’s what mine looked like after importing the Oracle DB Developer VM (I also have other VMs in the list):

To launch it, double-click Oracle DB Developer VM in the left menu.
Alternatively, you can click once to select it, then click the green Start button/arrow at the top.
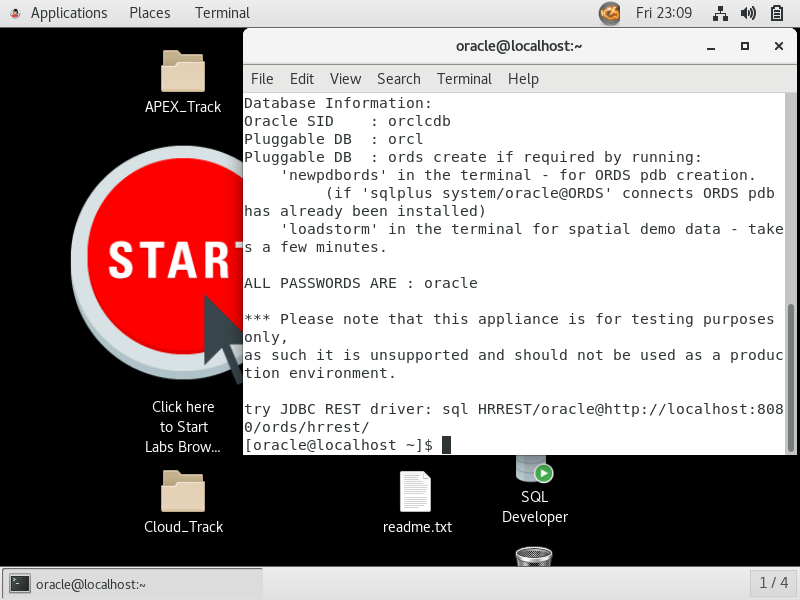
This launches a new window with the Oracle DB Developer VM.
At first this may be blank:

However, after a short time, it should eventually settle at something that looks like this:
Congratulations! You have now installed Oracle on a Mac!
Any time you want to work with your Oracle Database installation, you’ll need to start the VM first. You can keep it running in the background, but if you ever shut it down, you’ll need to relaunch it if you want to work with it again.
Connect to Oracle Database
Now that Oracle Database has been installed, you can use tools such as SQL Developer and SQLcl to connect to it.
- SQL Developer is a GUI interface (a bit like what SSMS is to SQL Server).
- SQLcl is a command line interface. This allows you to connect to Oracle via a Terminal window on your Mac.
These tools are available in the Oracle DB Developer VM. In fact, the SQL Developer icon can be seen on the desktop of the above screenshot.
You can launch these programs from within the virtual machine, or you can download and install them to run natively on your Mac.
To run SQL Developer in the virtual machine, double-click on the SQL Developer icon on the desktop of the virtual machine. If prompted with a username and password, enter the following:
| Username | hr |
| Password | oracle |
This should connect and you should be able to run SQL queries immediately.
The Oracle DB Developer VM includes some sample schemas, and the hr account is a good one to get started with if you want to play around. This schema contains information about employees—departments, locations, work histories, and related information. You can also use the sys or system accounts if required. The password is oracle for those too (all passwords in the Oracle DB Developer VM is oracle).
However, you might prefer to run SQL Developer and/or SQLcl natively on your Mac, check out the following articles for downloading and installing them:
When you do run those applications natively on your Mac, you’ll need to open VirtualBox and start the Oracle DB Developer VM whenever you want to connect to the above Oracle installation.
Another Option: Oracle in a Docker Container
Since writing the above article, Oracle has made Oracle Database available for MacOS via a free container image. I have written another article on how to install Oracle 26ai on a Mac via Docker. So check it out if you prefer to use Docker instead. It’s much easier, and doesn’t require creating a virtual machine.