This article is Part 2 of the Microsoft Access tutorial.
Here’s what’s included in this article:
- Design View.
- Add field properties to a field.
- Add two more tables (for the relationship)
- Set up a relationship between three tables.
Design View
Everything we’ve done so far with our table has been in Datasheet View. Datasheet View displays our table as a grid – like a worksheet in Excel.
Access also provides another view of our table – Design View.
Design view is just another way of looking at the table when setting it up. It can make it a bit easier to set up the fields.
To switch to Design View, click the View button in the Ribbon, or click the Design View icon at the bottom of the screen:
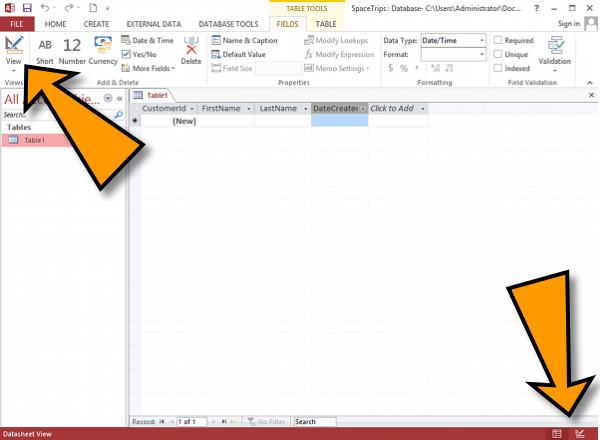
You can switch between views as often as you like by clicking the applicable button/icon.
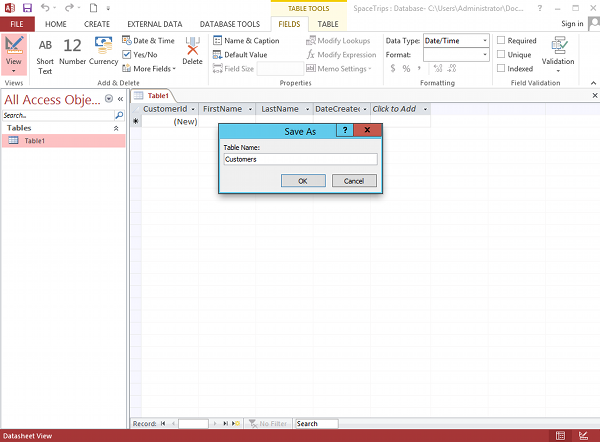
When you switch to Design View, you will be prompted to save your changes (if you haven’t already done so). The first time you do this, you will be prompted to provide a name for your table.
Name it Customers:
Once in Design View, you will see the fields listed vertically alongside their data type.
When you click on a field, the field’s properties will be displayed in the bottom frame.
Select the DateCreated field by clicking on it, then set the following properties:

Here they are again in case that’s too small to read:
| Property | Value |
|---|---|
| Format | General Date |
| Default | =Now() |
Leave the other properties as they are.
The Format property tells Access what format to store the data in. By using General Date, we tell Access to store this field in a general date format.
The Default Value tells Access to set the field to that value whenever a new record is created. By setting it to =Now() we tell Access to automatically set the field to the current date and time when the record is created.
You may have noticed the little key icon next to the CustomerId field. This indicates the primary key field. A primary key is a unique identifier field for the table. No two records can contain the same value in their primary key field. This becomes crucial when establishing relationships between tables. We’ll look at relationships soon.
Expressions
The =Now() value is an expression. Expressions can be very useful when setting up the field properties.
An expression is a combination of one or more functions, operators, constants, and identifiers (eg, the names of fields, tables, forms, and queries) that Access will interpret, then provide a result.
Expressions can be quite complicated, so Access provides the Expression Builder which helps you build expressions by “point-and-click”.
Input Masks
Input masks are type of expression that allows you to specify exactly how data should be entered into a field. For example you could set it up so that users can only enter dates in a certain format, phone numbers in a certain format, etc.
Restricting input like this helps maintain data integrity. It helps keep the data accurate and consistent.
The following is an example of an input mask used for restricting a phone number field to a certain format:
(999) 000-0000
There are many ways to restrict data with input masks. The easiest way to create an input mask is to use the Input Mask Wizard. The Input Mask Wizard is similar to the Expression Builder – it lets you create an input mask without needing to know how to write the expression.
Relationships
An Access database allows related data to be stored across multiple tables, and linked by establishing a relationship between the tables.
This is one of the most powerful things about Access (and all relational database management systems). Relationships provide an efficient way to store data, as you can enter data once, then reference it from elsewhere in the database. This is why we call it a relational database.
So go ahead and create two more tables using the same steps you used to create the first table. Call one table Products and the other Orders. Give each table four fields, as listed below.
If you still have Table1 feel free to rename it and use it.
Products
Set the Products table up with the following fields:
| Field Name | Data Type |
|---|---|
| ProductId | AutoNumber |
| ProductName | Short Text |
| Price | Currency |
| DateCreated | Date & Time |
Orders
Set the Orders table up with the following fields:
| Field Name | Data Type |
|---|---|
| OrderId | AutoNumber |
| CustomerId | Number |
| ProductId | Number |
| DateCreated | Date & Time |
Also, be sure to set up both DateCreated fields with the same properties as on the Customers table.
Here they are again:
| Property | Value |
|---|---|
| Format | General Date |
| Default | =Now() |
Leave the other properties as they are.
So you should now have three tables: Customers, Products, and Orders.
Now let’s create a relationship between them.
Start by clicking the Relationships button from the DESIGN tab on the Ribbon:

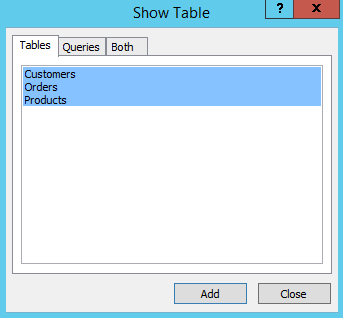
This will launch the Show Table dialog, which contains a list of tables. Select all three tables and close the dialog.
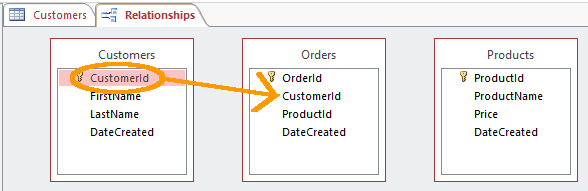
The Relationships tab will appear with all three tables. Click and drag the CustomerId field from the Customers table (Customers.CustomerId) to the CustomerId field on the Orders table (Orders.CustomerId).
The Edit Relationships dialog will pop up containing both fields. Ensure Enforce Referential Integrity is selected and click OK
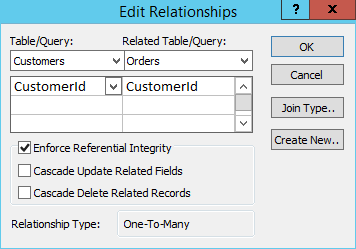
Then do the same for the ProductId (i.e. drag Products.ProductId over Orders.ProductId and click OK at the Edit Relationships screen).
Once complete, you will see the following relationship diagram:
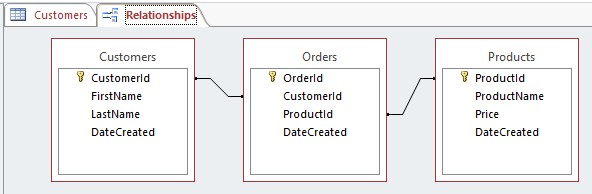
Congratulations! You have just created a relationship.
There are three types of relationships:
- One-to-one
- One-to-many
- Many-to-many
The one we just created is a many-to-many relationship.
Now, the important thing about relationships is this: The linked fields must contain matching data.
You might remember that the fields with the little key icon are called primary keys (they are the unique identifier for the table). Well, the fields that link to those are called foreign keys.
The value of a foreign key field must match a value within the primary key field that it is associated with. So for example, the Orders.CustomerId field can only contain a value of 3 if there’s also a value of 3 in the Customers.CustomerId field.
About Enforcing Referential Integrity
Strictly speaking, it is possible to have linked fields with non-matching data. You could allow this by disabling the Enforce Referential Integrity option on the Edit Relationships screen while setting up the relationship.
But this will not help you maintain referential integrity. By selecting Enforce Referential Integrity, the system will check the data before it’s entered into a foreign key field. If there’s no matching value in the referenced primary key field, then the system won’t allow the data to be entered.
If you don’t select that option, the system won’t check the data and you could end up with lots of orphaned records. Not a good thing if you want your data to be accurate and consistent.
Next Up
Next, for the 3rd and final part of this Microsoft Access tutorial, we’ll be looking at Queries, Forms, & Macros.
Or return to Part 1: Databases, Tables, & Fields.