In a previous article about creating a SQL Server Agent job with T-SQL, I demonstrated how to create a job with a single step.
In this article, I’ll show you how to create a job with multiple steps.
Example
When you create a SQL Server Agent job with T-SQL, you need to use several stored procedures. This is because each part is treated independently to the others. For example, the sp_add_job procedure creates the job, and the sp_add_jobstep procedure creates a step in that job.
When you create a job that has more than one step, you need to call sp_add_jobstep multiple times, each call defining a different step.
Also, if you want the job to progress through the steps (and not exit the job after the first step), you’ll need to specify that when you call the procedure.
Here’s an example that does all of that.
USE msdb;
GO
EXEC sp_add_job
    @job_name = N'SqlAgentTest',
    @description = N'Backup the Movies database.',
    @category_name = 'Database Maintenance';
GO
EXEC sp_add_jobstep
    @job_name = N'SqlAgentTest',
    @step_name = N'Insert data for step 1',
    @subsystem = N'TSQL',
    @command = N'USE TestDB; INSERT INTO SqlAgentJobs VALUES (''SqlAgentTest'', 1, SYSDATETIME())',
    @on_success_action = 3;
GO
EXEC sp_add_jobstep
    @job_name = N'SqlAgentTest',
    @step_name = N'Insert data for step 2',
    @subsystem = N'TSQL',
    @command = N'USE TestDB; INSERT INTO SqlAgentJobs VALUES (''SqlAgentTest'', 2, SYSDATETIME())',
    @on_success_action = 1;
GO
EXEC sp_add_schedule
    @schedule_name = N'Run_Sat_6AM',
    @freq_type = 8,
    @freq_interval = 64,
    @freq_recurrence_factor = 1,
    @active_start_time = 060000;
GO
EXEC sp_attach_schedule
   @job_name = N'SqlAgentTest',
   @schedule_name = N'Run_Sat_6AM';
GO
EXEC sp_add_jobserver
    @job_name = N'SqlAgentTest',
    @server_name = N'(LOCAL)';
GO
That code creates a job with two job steps. It also creates a new schedule, attaches that job to the schedule, then targets the job at the local server.
The part that creates the job steps is this:
EXEC sp_add_jobstep
    @job_name = N'SqlAgentTest',
    @step_name = N'Insert data for step 1',
    @subsystem = N'TSQL',
    @command = N'USE TestDB; INSERT INTO SqlAgentJobs VALUES (''SqlAgentTest'', 1, SYSDATETIME())',
    @on_success_action = 3;
GO
EXEC sp_add_jobstep
    @job_name = N'SqlAgentTest',
    @step_name = N'Insert data for step 2',
    @subsystem = N'TSQL',
    @command = N'USE TestDB; INSERT INTO SqlAgentJobs VALUES (''SqlAgentTest'', 2, SYSDATETIME())',
    @on_success_action = 1;
GO
In the first call, the part that goes @on_success_action = 3 is what makes the job continue to the next step.
The default value is 1, which means the job will quit after completion of the first step (which is what we specified in the second step). So if we hadn’t included the @on_success_action = 3 part in the first step, the job would quit without proceeding to the next step.
You can also specify @on_fail_action, which specifies what will happen if that step fails.
The values that you can provide to @on_success_action and @on_fail_action are as follows:
1 | Quit with success. This is the default for @on_success_action. |
2 | Quit with failure.This is the default for @on_fail_action. |
3 | Go to next step. |
4 | Go to step (ID). This is where you provide the ID of a step for which you want the job to progress to. |
View the Job Steps
You can use sp_help_job to get information about the SQL Server Agent jobs in the system.
You can use it with or without parameters, but to get the job step details, you need to provide the job name or ID.
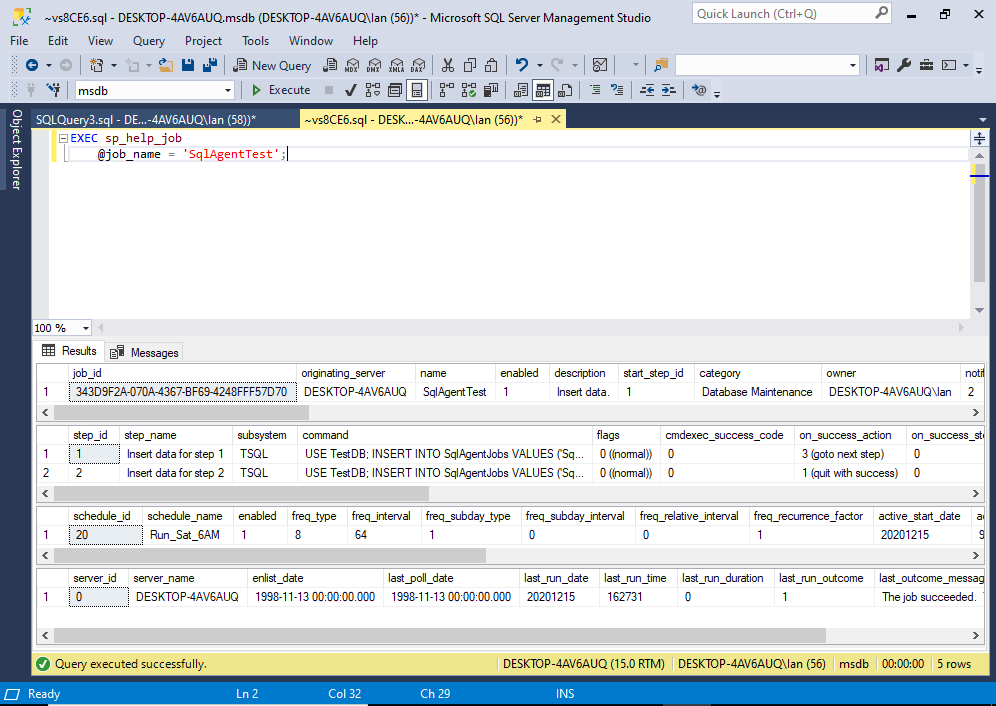
We can use it to see both job steps that we created for the job.
Like this:
EXEC sp_help_job
	@job_name = 'SqlAgentTest';
Here’s what the result looks like when executing it in SSMS:

Here’s an example of the code when using the ID:
EXEC sp_help_job
	@job_id = '343D9F2A-070A-4367-BF69-4248FFF57D70';
When using the ID, you can omit the parameter name if you wish.
Example:
EXEC sp_help_job '343D9F2A-070A-4367-BF69-4248FFF57D70';You can also use sp_help_jobstep in the same way to return just the job steps (without all the other info about the job). This accepts the job name or ID, as well as an optional step name or ID.
Full Syntax
The full syntax of sp_add_jobstep goes like this:
sp_add_jobstep [ @job_id = ] job_id | [ @job_name = ] 'job_name'
     [ , [ @step_id = ] step_id ]
     { , [ @step_name = ] 'step_name' }
     [ , [ @subsystem = ] 'subsystem' ]
     [ , [ @command = ] 'command' ]
     [ , [ @additional_parameters = ] 'parameters' ]
          [ , [ @cmdexec_success_code = ] code ]
     [ , [ @on_success_action = ] success_action ]
          [ , [ @on_success_step_id = ] success_step_id ]
          [ , [ @on_fail_action = ] fail_action ]
          [ , [ @on_fail_step_id = ] fail_step_id ]
     [ , [ @server = ] 'server' ]
     [ , [ @database_name = ] 'database' ]
     [ , [ @database_user_name = ] 'user' ]
     [ , [ @retry_attempts = ] retry_attempts ]
     [ , [ @retry_interval = ] retry_interval ]
     [ , [ @os_run_priority = ] run_priority ]
     [ , [ @output_file_name = ] 'file_name' ]
     [ , [ @flags = ] flags ]
     [ , { [ @proxy_id = ] proxy_id
         | [ @proxy_name = ] 'proxy_name' } ]
See Microsoft’s documentation for sp_add_jobstep for an explanation of each parameter, as well as the values that each accepts.